

LED PCB Assembly
Micron has accumulated years of experience in identifying and dealing with the challenges of LED PCB assembly in order to better manage the risks associated with it. Here are some of the more important items we consider when performing four basic operations for SMT LED assemblies.
Printing LED PCBs
“Garbage in, garbage out.” Stephen Wilfred Hey
If the first step is defective, the rest of the process is flawed. Our first step to consider in building LED assemblies is the operation of printing solder paste onto the PCB.
Poor printing causes more defects than any other step in an SMT process. One of many considerations is to ensure that component leads, stencil apertures, and PCB pads match up. This is particularly important when producing LED assemblies.That’s because LED manufacturers are producing a wide variety of LED package and lead designs.
LED lead designs vary widely in shape, size, number, sidedness, and symmetry. Each of these lead designs comes with its own recommendations for PCB land patterns and stencil aperture dimensions. This requires tight control for procurement of component (LEDs), stencil, and PCB.
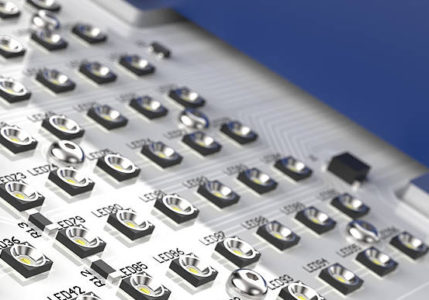
Picking-n-Placing LEDs
“Be careful how you pick, that you may place well.” Confucius (maybe)

Most electronic components have a flat, relatively rugged surface that makes it convenient to pick from a spool, and then place on a printed PCB. LEDs are not like most components in this regard.
LED surfaces can be curved, fragile, and irregular. This requires that an LED assembly be processed with special attention to the tooling and centering used to pick and place.
In choosing a tool for use with an LED, consider the force requirements and tool head geometry, as well as the capture and release conditions. Depending on the surface of the LED and the head of the tooling, you might consider using mechanical centering, optical centering, or a combination of both.
Profiling LED Assemblies
“Keep a cool head and maintain a low profile.” Deng Xiaoping
Reflowing any PbFree assembly can be challenging. That’s especially true when there are LEDs on board. The fact that LED brightness, color, and life expectancy are strongly affected by temperature is well known. It’s always of great importance to accommodate the most heat sensitive component on an assembly, and oftentimes that’s an LED.
Profiling LED assemblies to assess temperature settings in the oven can be complicated by several factors. These include special board materials, thermal underpads, thermal vias, and heat sinks.
Different methods are available to make thermal measurements to safeguard the LEDs. Thermocouples, IR devices, thermal pads, and various software driven tools can be used to ensure the proper profile is determined.
Purifying LED Assemblies
“Solitude is the place of purification.” Martin Buber
Clean or no clean is the first decision. If you clean, then mechanical, chemical, and thermal considerations can all be involved in the operation. Each of these should be considered when LEDs are on board. Mechanical considerations are important because of the fragile surface structures of some LEDs.
If cleaning chemistry is used it needs to be compatible with the materials of construction, and effective at removing residues from above and beneath LEDs. Thermal considerations may become important if long wash times are combined with high liquid or vapor temperatures.